

本次搭建的hoshino-bot来源至Ice-Cirno大佬在github上的HoshinoBOT项目,QQ使用的Go-cqhttp来源至Mrs4s大佬,安装教程主要来自地河大佬这一篇文章“Linux 下部署一个公主连结 qq 群聊机器人”。
本篇文章皆在记录博主本人在自行搭建机器人时参考的命令及碰到问题时候查找的一些解决方式。
由于本人之前是在Windows上搭建的Hoshinobot,但是由于windows占用的vps系统资源过多,固打算放弃在windows上的使用而转移到centos上。
1.安装运行所需要的环境
yum -y update
yum -y groupinstall "Development tools"
yum -y install wget zlib-devel bzip2-devel openssl-devel ncurses-devel sqlite-devel readline-devel tk-devel gcc* libffi-devel make git vim screen
#如果你正在使用ARM架构的处理器,请额外执行yum -y install xz-devel
2.安装Python 3.9
wget  https://mirrors.huaweicloud.com/python/3.9.5/Python-3.9.5.tgz
# 下载 Python 源代码
# 官方源 : https://www.python.org/ftp/python/3.9.5/Python-3.9.5.tgz

tar -xf Python-3.9.5.tgz && cd Python-3.9.5
# 解压并进入文件夹

./configure
# 编译检查, 生成 Makefile

make&&make install
# 编译安装

pip3 install --upgrade pip -i https://pypi.tuna.tsinghua.edu.cn/simple/
# 后面的-i参数的内容是用于国内机器的下载加速的
3.获取go-cqhttp
cd
# 进入到用户文件夹

mkdir go-cqhttp&&cd go-cqhttp
# 创建 go-cqhttp 文件夹并将工作路径切换到这个文件夹

wget https://github.com/Mrs4s/go-cqhttp/releases/download/v1.0.0-beta8-fix2/go-cqhttp_linux_amd64.tar.gz
# 可使用 github 镜像站提高境内服务器下载 github 文件的速度
# 例如 hub.fastgit.com, github.dihe.moe
# 下载 go-cqhttp

tar xf go-cqhttp_linux_amd64.tar.gz
# 解压

chmod +x go-cqhttp
# 给 go-cqhttp 执行权限(默认有带x权限,其实这一步可以不用使用)

./go-cqhttp
# 首次运行 go-cqhttp , 在当前目录下生成配置文件 config.yml

ctrl+c取消go-cqhttp的运行,然后准备配置go-cqhttp的配置文件
4.配置go-cqhttp配置文件
config.yml:
请先填写好要作为机器人登录的账号, 暂先不填密码。
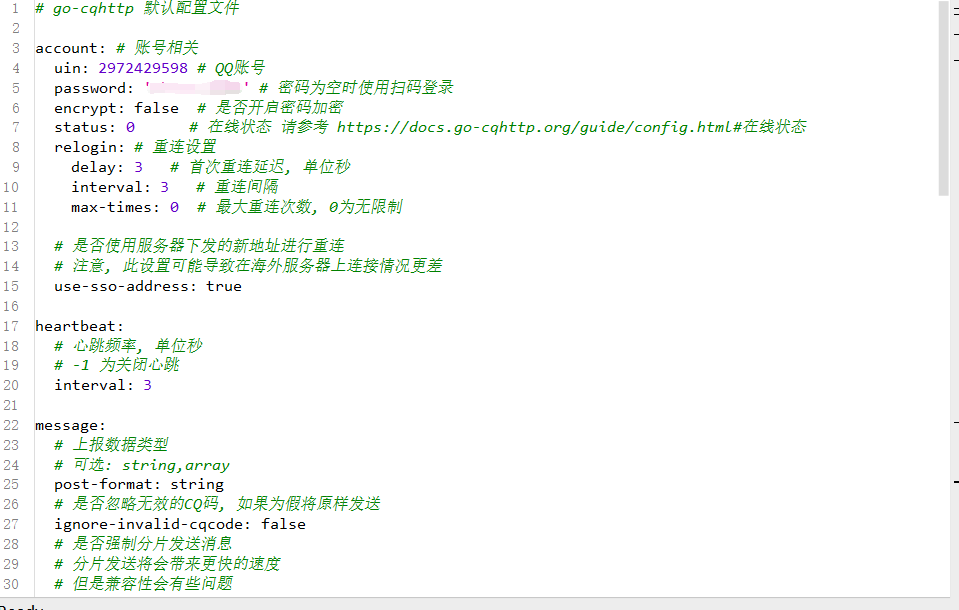

成功登录后还会生成一个名为 device.json 的文件, 它保存的是登陆设备的信息 :
{
    "protocol": 0, // 设备种类, 值为 0 代表 iPad, 值为 1 代表 Android 手机, 值为 2 代表 Android 手表
    "display": "xxx", // 无需考虑的配置项
    "finger_print": "xxx", // 无需考虑的配置项
    "boot_id": "xxx", // 无需考虑的配置项
    "proc_version": "xxx", // 无需考虑的配置项
    "imei": "xxx" // 无需考虑的配置项
}
这里要注意一下config.yml文件里边反向ws的配置
由于我之前windows使用的hoshino的端口是9222,所以以下ws的配置我全部是以9222端口来设置的
vim config.tml
# 修改以下项
vim config.tml
# 修改以下项
servers:
  - ws-reverse:
      universal: ''
      api: ws://127.0.0.1:9222/ws/api/
      event: ws://127.0.0.1:9222/ws/event/
      reconnect-interval: 3000
      middlewares:
        <<: *default
5.获取Hoshino-bot
cd
# 进入到用户文件夹

mkdir pcrbot
# 创建一个文件夹

cd pcrbot
# 将工作路径切换到这个文件夹

git clone https://github.dihe.moe/Ice-Cirno/HoshinoBot.git
# clone 仓库,国内服务器最好使用镜像站,不然卡死。。
6.安装依赖
记得在安装一个新插件时,要看看插件需求的依赖是什么,一般依赖会写成一个requirements.txt文件
,在插件的文件夹里,输入:pip install -r requirements.txt 安装依赖
# 方法一: 直接使用 pip(推荐用这个,因为我的服务器装不上poetry。。)
pip3 install -r https://pan.dihe.moe/requirements.txt -i http://mirrors.aliyun.com/pypi/simple/
# 这个指令后的 -i http://mirrors.aliyun.com/pypi/simple/ 是切换到国内源的意思

# 方法二: 使用 poetry (不建议使用)
pip3 install poetry
# 安装 poetry

wget https://pan.dihe.moe/pyproject.toml
# 这是一份写好了的 pyproject.toml

poetry install
cd HoshinoBot
# 切换到 HoshinoBot 目录
cp -r hoshino/config_example hoshino/config
# 复制配置文件示例(这一步主要是改名,原来的config文件名字叫config_example,要改成config后才能使用)
vim hoshino/config/__bot__.py
# 修改配置项以自定义你的机器人, 按照中文注释填好。
7.获取静态资源
cd ~/pcrbot/HoshinoBot
# 切换工作路径

wget https://pan.dihe.moe/res.tar.gz
# 下载静态资源

tar xf res.tar.gz
# 解压静态资源
8.测试BOT功能
(1)启动go-cqhttp
screen -S go-cqhttp
# 创建一个新的窗口用于运行 go-cqhttp

cd ~/go-cqhttp

./go-cqhttp
# 运行 go-cqhttp

# 需要扫码验证登录, 需要先在移动端登录你在配置文件中填写的 bot 的 qq 账号, 然后扫码

# 有极低概率获取到无效的登陆地址而导致登陆失败, 重试即可解决

# 成功登陆后, go-cqhttp 会尝试连接到 Websocket Universal 服务器 ws://127.0.0.1:9222/ws/
# 此时应该会提示链接出错 ( 因为 HoshinoBot 还没有运行 ), 暂先不管, 直接使用组合键 Ctrl + a ,d 挂起这个窗口
#之后使用 screen -r 查询程序的窗口后,在输入screen -r 窗口号 就能切回go-cqhttp程序框
(2)启动Hoshino
screen -S hoshino
#创建一个新的窗口用于运行 HoshinoBot

cd ~/pcrbot/HoshinoBot
# 切换工作路径

# 运行 Hoshino:
# ↓↓↓ 直接使用 pip 的场合 ↓↓↓
python3 run.py
这里也可以使用绝对路径来运行 /root/pcrbot/HoshinoBot/python3 run.py

# ↓↓↓ 使用了 poetry 的场合 ↓↓↓
poetry run python run.py
9.安装插件
相关插件可以在https://github.com/pcrbot这里查询及下载,插件安装位置为./HoshinoBot/hoshino/modules内,放置插件后记得修改./HoshinoBot/hoshino/config/_bot_.py的内容
Comments NOTHING